Basic processes
Becoming familiar
Before leaping in to your first net, familiarize yourself with the technique. This helps to avoid mistakes, saves work, probably saves money, and raises the standard of your first net.
For a 1st attempt the netting should be large enough to see the details of the work easily. A mesh stick about 38mm wide and cord about 3 - 4 mm thick, make a suitable combination. Have a rigid rod like 12mm dowel to support the head of the net.
Fig 9 First steps for a net
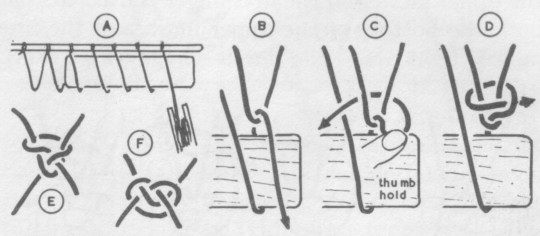
The crux of netmaking
Crux:
- Have the net with the working end on the left.
- On the rod set up a row of half meshes, using the mesh stick to regulate size and attaching with clove hitches or cow hitches (Fig 8 in previous chapter). Altho the meshes on the rod are shown spread out, and this is advisable for practice, it is more usual in production to have them close. as the work proceeds, allowing the meshes to pass along the gauge (fig 9A). A dozen will be enough for the practice set.
- Put the mesh stick against the bottom of the first mesh and take the needle of line behind the mesh stick, thru the loo and downwards (Fig 9B).
- Hold with the left thumb and pass the needle behind the mesh (Fig 9C).
- Bring it across the front and under the earlier part of the line (Fig 9D)
- Pull the knot tight without distorting it (Fig 9E) and the end will be in position to make the next mesh. If the knot is allowed to fall out of shape as it is tightened it will slide on the upper mesh and is useless (Fig 9F).
Altho the last paragraph is probably the most vital one in this book, variations on it improve the quality of the work and make for convenience and speed. With hundreds of meshes to form, any small saving of time on each makes an appreciable difference in total time.
1st variation
The first variation:
- The mesh gauge is held by the left hand with the fingers over the top and the thumb in front.
- The needle takes the line thru the upper mesh
- and the first finger is used to hold both:
- the bottom of the upper mesh
- and the line pulled tight over the mesh gauge (Fig 10A).
Fig 10 - Steps forming a mesh (1st variation)
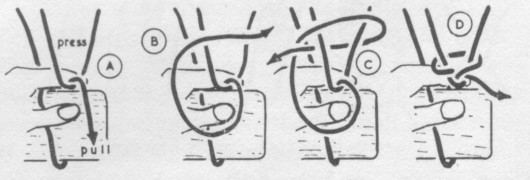
Pulling on the needle and controlling with the first finger of the left hand ensures each new mesh being kept exactly the right size.
Before going around the back of the upper mesh, a loop of line is thrown to the left above your left hand (Fig 10B) and the needle made to pass thru this after going behind the upper mesh (Fig 10C). Continue to hold with your left first finger until the sheet is pulled tight (Fig 10D).
2nd variation
Fig 11 - Forming a mesh
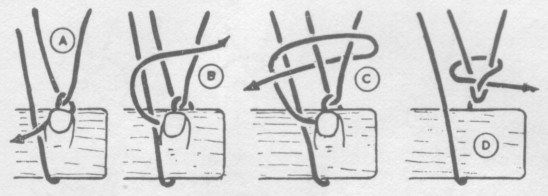
This seems to be the most popular method.:
- The mesh stick is held with the left hand below it, fingers behind and thumb in front.
- The needle takes the line thru the upper mesh
- and is pulled down so that it comes on the left of the thumb,
- which holds it against the mesh stick (Fig 11A).
- This forces and holds a loop on the left of the upper mesh as the needle is taken across the front (Fig 11B),
- to go behind both bars of the upper mesh and out thru this loop (Fig 11C)
- Pull the line tight and allow the part held under the thumb to release (Fig 11D).
A snag with this method is that uneven release of the thumb results in variations of mesh size. The best way to let go is to slide the left forefinger up the back of the mesh stick a short distance on to the upper mesh, so as to keep the new mesh and bottom of the upper mesh against the stick without slipping while the thumb is lifted and the line tightened.
3rd variation
Fig 12 A, B, C, D - Forming mesh
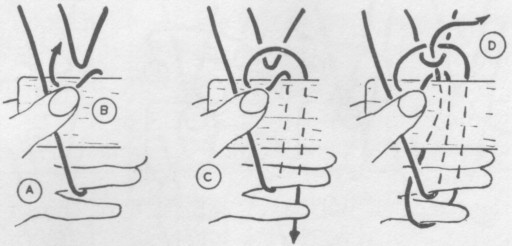
This is not much used, but it has value when working very small meshes in thread or other very fine line:
- The mesh stick is held from below with the first finger behind and thumb in front.
- The line comes down the front behind the thumb and back between 3rd and 4th fingers (Fig 12A),
- then up behind the mesh stick and
- down to be held by the thumb in front, without going thru the upper mesh (Fig 12B)/
- Throw a loop across the front of the upper mesh and take the line down behind mesh stick and fingers (Fig 12C).
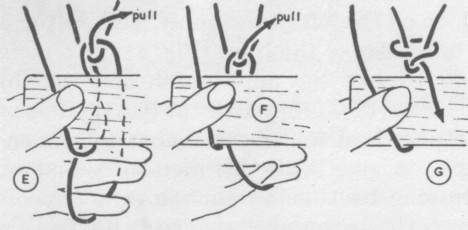
- Note: Pass the needle in front of your left hand, but behind the line coming down and the mesh stick, in front of the loop you are holding and thru the upper mesh, to take in the loop across its front (Fig 12D).
- Pull the working end. Let slip the piece under the thumb, then let go the loop between 3rd and 4th fingers (Fig 12E).
- Continue pulling to take up the slack, but hold on to the loop around the little finger until it befins to be drawn upwards (Fig 12F),
- then let the loop slip off and the result should be a complete knot (Fig 12G).
This method should be masterd if fine work is contemplated.
Fig 12 E, F, G - Forming mesh
2nd row
When a row of meshes have ben made from left to right, the next row will have to be made working back below them. If it is possible to support the rod so that it can be turned, or it is possible to work form the other side, most people find it better to reverse things so that the work is from left to right again. If this is impossible, the row will have to be worked from right to left.
A truly ambidextrous person mqy change hands and go thru all the motions the opposite way, but the average worker will probably want to continue letting each and do the same thing.
Some workers make each knot the same way as when coming across from the left to right, but this puts a twist in the mesh and it is better to form the knot the opposite way (Fig 13A), making each knot a mirror-image of the previous row, or by forming knots on the other side of the upper mesh, by taking the needle down thru (Fig 13B).
Fig 13 - Left-handed work and joints
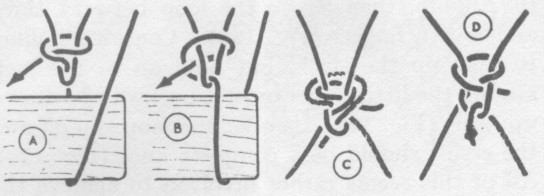
The problem only arises if the net is started on a rigid head. In other methods, described later, there is no difficulty in turning the net over. Even with a rigid head, there is enough slack to allow twisting the working row over after a few rows, particularly if the hitches on the rod are pulles close together.
The rod may be removed so that the hitches disappear and the first row of meshes gathered with a loop of rope or all hooked on one peg or over the rod. having all trhe meshes close together and pulling straight down makes for speed and convenience, but care is needed to avoid missing meshes when working new rows.
Joining lines
When the line from one needle is exhausted, join in a new line.
There are several ways to do this:
- Merely joint the old and new lines together with any of the joining knots (Fig 7 earlier chapter). This is less obvious if made close up to one of the netting knots.
- Slacken the last knot in th eold line and work the end of the new line back thru it (Fig 13C). This is the least obvous join.
- Use the end of the new line to make another similar knot over the top of the last one in the old line. This is the method commonly used in repairs.
- Tie a stopper knot (overhand or figure-of-8) in the end of the new line and lay this thru the upper mesh. Make the last knot in the old line over this (Fig 13D).
Altho starting with a rod or head rope is often necessary and is a good way to learn netting, a net is often needed without anything at the head.It is pssible to start on a rod or rope and withdraw it later, but this leaves the first row of meshes oversize, unless this is allowed for by using a narrower mesh stick. An alternative is to build up a chain of meshes and work the net on them. in this methos the first 2 rows of knots are sidways in relation to the length of the net, but that should not matter.
Fig 14 - Forming a chain
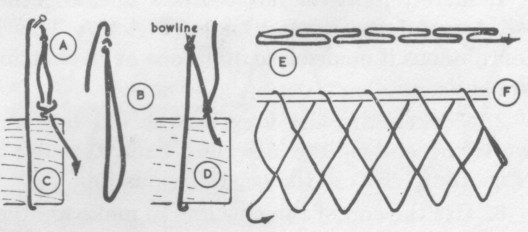
Make a loop in the end of the line (a bowline) the same length as the width of the mesh stick (Fig 14A) or the size of a complete mesh (Fig 14B). Hang this over a nail or peg. Bring the mesh stick up to it and form a mesh in the usual way, by working a shet bend around the bottom of the loop (Fig 14C). Remove the mesh stick and turn the work over so as to bring the new mesh to the right. Put the mesh stick below it and make another mesh (Fig 14D).
Continue braiding in this way making meshes until a chain of twice the nuber required in the width are made up (Fig 14E). This chain will form the first two rows of the final net. Support the work by a row of nails or pegs, a rod threaded thru, or by gathering the first row on to one hook. arrange the chain so that the working end is at the left and in position to starat making a new row of meshes (Fig 14F). from this stage, continue making rows of meshes as already described.
Fig 15 - Chaining on a loop
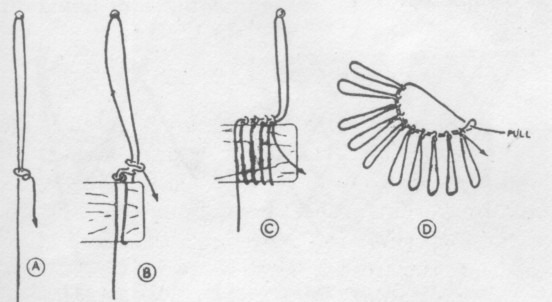
Another way of starting a free-edges net is to use a foundation loop which will be discarded later. This is a piece of line tied into a fairly large loop and hung on a peg.l Tie the end of the netting line to this and form a mesh on it, as tho it was normal upper mesh (Fig 15A), using any of the suggested methods. Continue making meshes in this way, bringing the needle up thru this loop and forming sheet bends over it (Fig 15B). The effect will be to pull the foundation loop down and along the edge of the mesh stick (Fig 15C).
Make sufficient loops for the first row of meshes required in the width of the net. Move the mesh stick down to the bottom of these loops and make another row of meshes. Continue in this way until a sufficient length is made. There is no need to keep the foundation loop in place agter the first few rows have been made. It can be untied and pulles or cut out. The knots made around it will open out and the first round of meshes which can be supported on a peg or head rope while the rest of the netting is completed.