Varying net shapes
The diamond-meshed netting with serrated edges described in the previous chapter serves for many purposes, but special nets may be required to fill awkward-shaped spaces or to have their edges prepared in a different way.
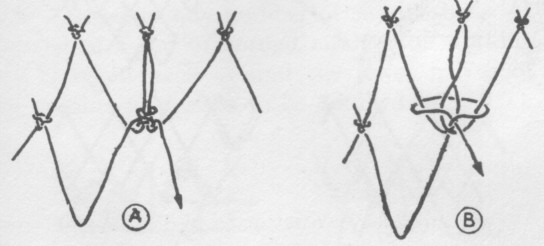
Fig 16 - Forming a net with straight sides
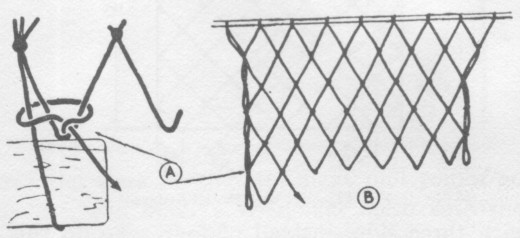
Fig 17 - Net with straight edges
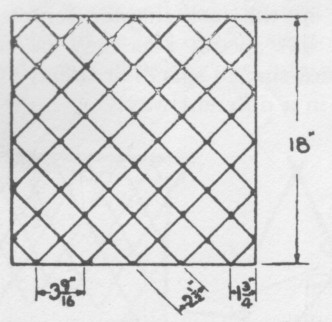
Straight-edged netting
The normal serrated edge is untidy.
There are 2 methods of making the edges straight:
- only the vertical edges are converted, top and bottom remaining serrated.
Method 1
Only the vertical edges are converted, top and bottom remaining serrated.
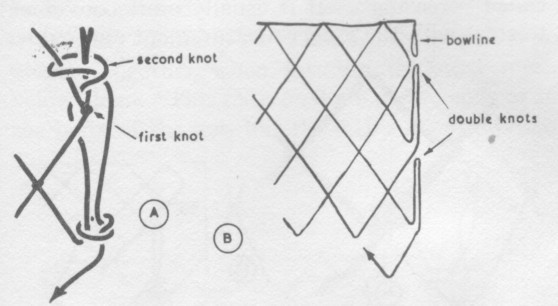
Start netting in the usual way, using a chain of meshes or a head rope. At the start of each new row, let the knot take in the side of the mesh being formed as well as the one above (Fig 16A).
The first row will not be affected, but the others will be reduced in length by a mesh and will have the end meshes with double edges, gaining in strength (16B).
If the net has to have straight edges all round (Fig 17) the outer meshes will have to be worked with 3 sides instead of 4. to do this it iis necessary to know the lenght of the diagonal of the mesh (fig 5). Start by making a chain to form the first edge.
Make a bowline in the end of the twine. have the length of thre loop equal to hald the diagonal of the mesh, that is, 13/4 inch for 21/2-inch mesh.Bend the working end round to form a triangle, with the bowlinw as the first side, making the second side also 13/4 inch and the last side 21/2 inches.
Now hang the triangle over the 2 nails, with the bowline between them (Fig18A).
Fig 18 - Making a chain for a straight-edge
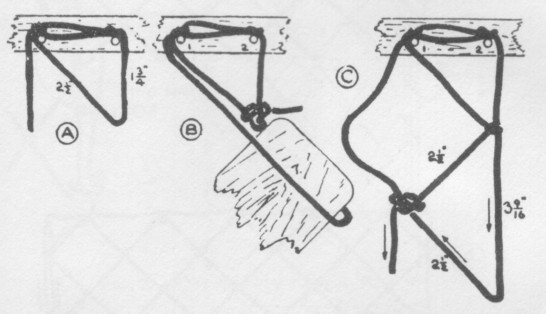
Using the mesh stick (21/2 inches wide) make an ordinary mesh on the bottom corner of the triangle, taking the pull on nail "1" (Fig 18B).
Move the work so that the next pull comes on nail "2", and make a triangular mesh with the sizes shown (Fig 18C). Note that the long side is equal to the diagonalof the mesh, therefore the angle opposite is a right angle. This can be made longer if the meshes are required estended-diamond shape instead of square. Make another ordinary mesh on the bottom of the triangular one, then another triangular one. Continue making alternately triangular and ordinary meshes until you have sufficient ordinary meshes to make up the desired width. Finish off with a small triangular mesh like the first one. It may be found helpful in getting a direct pull if, as it is finished, each triangular mesh is moved up and hooked over the nails.
Fig 19A - 4 straight edges
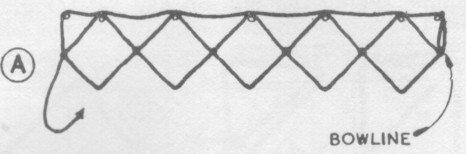
Hang the work on a row of nails or pegs (Fig 19A). Make a straight side by forming a triangualr mesh, then continue across making ordinary meshes. At the right-side make a triangular mewh by knotting over the top of the knot already at the end of the bowline (Fig 19B).
Fig 19B - 4 straight edges
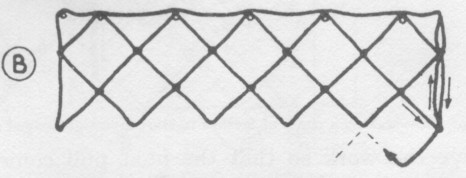
Double the working end back on itself, and tie it to the lower corner of the triangle with an ordinary overhand knot (Fig 20A). continue making rows, forming triangluar meshes at the ends, doubling where necessary to bring the working end down to a new row (Fig 20B).
Fig 19C - 4 straight edges
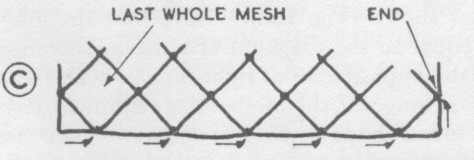
After a few rows, the first rows may all be gathered on to one loop of rope or a nail, as was done with the first net. The bottom is made straight by getting the net into shape, and then working the twine across in a straight line, joining it with weaver's knots to the bottoms of the meshes (Fig 19C).
Fig 20 - One edge of a straight-edged net
Tapering
Nets may be tapered slightly by altering the sizes of meshes in successive rows, but where mush taper is needed the number of meshes in a row must be increased or decreased.
Definitions:
- bating: decreases the length of successive rows
- creasing: increases the length of successive rows
It s usually more convenient to start with the longer meazurement and reduce.
Fig 21 - Reducing the number of meshes
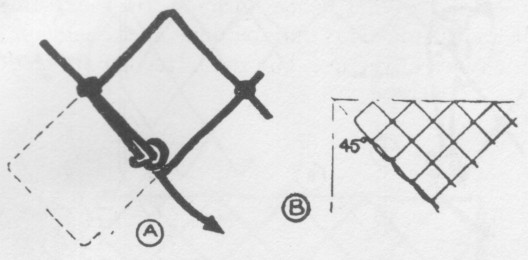
Methods of bating:
Fly meshing
In the construction of some fishing nets and with possible uses elsewhere, the tapered edge can have every other mesh omitted. This is called fly meshing and provides a series of inedependent loops along the edge (Fig 23A).
The fly meshing is provided for attachment to something else and has to take extra loads so it is usually doubled, then strain around the edge is taken by double line. Fly meshing produces a projecting mesh on alternate rows. When one of these is formed (Fig 23C), take the working end around agian, knotting to the mesh above and outlining its own mesh, to finish with a knot on top of the earliert one (Fig 23D). From that point continue across with normal meshes.
Extra strength
If the width of the net is reduced (bated) to a straight taper instead of fly meshing, but extra strength is needed, it is possible to sue the doubling method to rodice a taper and strengthen by giving double thickness of line in 2, 3 or any number of end meshes. At the end of a row of normal meshes the working end is taken back around the lower halves of the number of meshes to be doubled (Fig 24A).
Fig 24 - Doubling the edge of a net
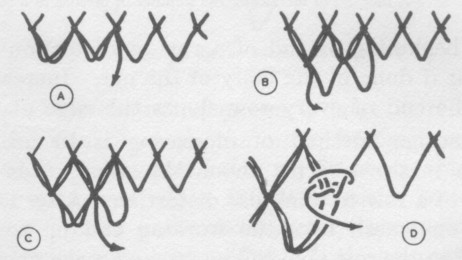
Drop down to the bottom of these meshes and work back to the edge (Fig 24B). Double back over these meshes (Fig 24C) and take in the long-armed mesh (Fig 24D) with the adjoining mesh and continue making normal mehses across the net.
Creasing
Creasing:
- 2 meshes on one loop:One method of increasing the number of meshes in a row is to work 2 meshes on to one loop of the previous row (Fig 25). this is best done at the beginning or end of a row as distortion will occur if done in the body of the netl. Increasing at the end of every row slopes the edge at 450.
- False mesh:Another method of creasing is to form a false mesh. This is done near the end of a row to minimize distortion. After forming one mesh take the working end up to the knot in the row above (Fig 26) and make another knot over it. bring the working end down beside itself and join the two strands together with a thumb knot in line with the knots in the lower row. Continue across in the ordinary way.
| Fig 25 - 2 meshes on one loop 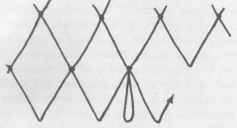
Fig 26 - False mesh 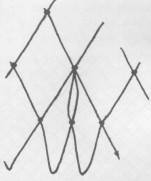 |
Octagonal nets
With the ability to crease or bate, the making of almost any shape of flat net becomes possible.
Round nets call for a special technique and their meshes cannot have a uniform size. Also where the net diameter is large in relation to the size of the mesh the work becomes tedious. If an octagonal net is acceptable instead of a true circle, it will be easier to make and will have uniform neshes. The angles at the corner may be rounded a little by reducing the size of the meshes there.
The side of an octagon is approximately 2/5s of the width across the flats (not corner to corner); so that if the number of meshes in the width can be arranged as an even multiple of 5, the arithmetic will be easy. This 8-sided net (Fig 27) could be made by starting at one side, increasing to the full width, and later decreasing; but it is probably easier to do the center rectangle first, followed by one tapered side, and then attach the other tapered side.
| Fig 27 - Octagonal net
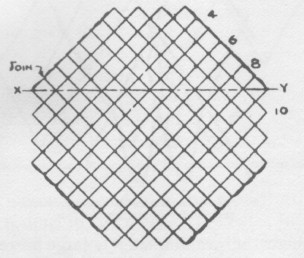 |
In the example shown the width of the octagon is 10 meshes. 2/5s of this is 4, so the side has 4 meshes in it.
Make a chain of meshes for the long side (X - Y) of the rectangle, and on this work 3 more rows. Then decrease by one mesh at the end of each row until there are only 4 left in the last row. Turn the net around and connect a new twine at "X" on the other side of the first row.l Work along the first row, and decrease at the ends as before, continuing until a row of 4 meshes is left. The net shown has 4 serrated edges, but these could be made straight (Fig 16 to 20).
Circular nets
Circular nets must be started at the center and worked outwards. This results in successive rings of meshes having varying sizes and shapes. Approximate evenness is maintained by increasing at intervals in each circle.
This varying of mesh shape forms an attractive pattern, but where for practical purposes, as in some fishing nets, it is important that there should be no oversize meshes, there is another method of forming the base of a bag (See Ch 5 - Tubular nets and bags).
| Fig 28 - Starting with a grommet
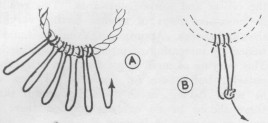 |
Form a small grommet and work as many half meshes as possible on to this, supporting the grommet on a peg or nail. Tuck the end of the line into the grommet, as in splicing, or tie it securely, then attach the half meshes by clove hitches (Fig 28A). Bring the working end down to the bottom of the last mesh and knotit there ready to start the next round (Fig 28B).
Instead of starting with a grommet it is possible to make sufficient meshes in a row and bend them into a ring afterwards. This will prove less tedious in making a small-mesh net. Form a slip knot with the working end, letting the starting end hang free while the loop is supported on a nail (Fig 15A). With this loop in the position of an upper mesh form a new mesh on it (Fig 15B). Continue making meshes around this loop (Fig 15C) until sufficient are formes. Remove the mesh stick and pass the starting end thru the projecting part of the loop and pull the line tight thru the knots formed on it until it closes on the free end (Fig 15D). pull on the free end to form the meshes into a closed circle, and knot the working part to the bottom of the last mesh ready to start the next round.
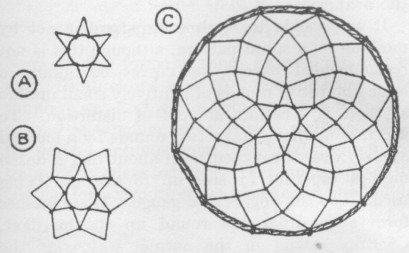
The 2nd row can be worked around in the normal way. still with the grommet supported on a nail or peg, altho some workers prefer to hand the net by its center with a supporting cord attached to a toggle under the grommet. If it is important that the net should lie flat, it is better to work on a peg projecting from a bench top. After the second round the next round would have very distorted meshes if plain netting is continued. To correct this increase (Fig 25 or 26) either at every mesh or at alternate meshes, as seems necessary. Increases will probably be necessary in all further rounds, but these should be spaced symmetrically to preserve an even appearance. Fig 29 shows stages in building up circular meshes, altho the starting meshes arekept fewer than would actually be the case for the sake of clarity.
Fig 29 - Building a circular net
A net may be made of semi-circular shape or in the form of any sector of a circle. Start with the grommet and put half meshes on one side only. Work around in the same way as for a round net, but when the desired limit is reached each side, treat it as a straight edge and return along the next row.
It is possible to work a circular flat net by meshing in a spiral pattern, altho this is not recommended except for circles containing a large number of rounds of relatively small meshes as there is a certain amount of distortion. To use this method, make 2 rounds by a method already described, then form about half a dozen meshes tapering in size up to the size being used. Use the fingers as a gauge. These meshes form steps from one round up to the next. Continue round in the normal way. At the tapering meshes there may have to be some adjuctment in the sizes of the next ones, but after this it should be possible to continue working around, increasing as necessary, but without coming to any apparent end of each round; meshing normally until the net is the required size.