Square nets
Back to net & rope index
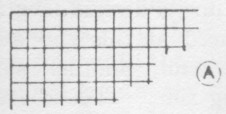
Fig 36A - square net, tennis net
The nets so far described are diamond-meshed. A diamond mesh can be square, but, unlike square-mesh which hangs at right angles to the end rope, a point of each diamond is at the top. These diamond-mesh nets have flexibilty of size as it is ossible to pull them longer one way while reducing the size the other way. This serves for most purposes, but sometines it is preferable for a net to maintain a definite size. In that case it has to be made with a side of a mesh parallel to the side of the net. This is called square-mesh netting (Fig 36A). Tennis nets form a common example of this type of netting.

Square-meshed netting is not so tolerant of uneven work and other deficiencies as diamond-meshed netting, so where there is no particular need for square-mesh, choose to produce a diamond-mesh, for it is both quicker and easier.


There are a number of variations in working a square-meshed net, but basically the principle is the same:
  • Work is started at one corner by the formation of one mesh.
  • The next row contains 2 meshes, and so on, increasing each row, which is actually formed at 450 across the net.
  • This is continued until one side has sufficient meshes in it to make up its desired length.
  • After this, meshes are reduced at this end and increased at the opposite end, another side forming parallel to the long side.
  • This is continued until the longer side is the right length,
  • then both ends of further rows are reduced until the final corner is reached.
It is usual to start at the top-left corner, with thte shorter side on the left. Often a square-meshed net is made with the line at its edge doubled for strength, but it is possible to do it with a single edge. Both methods are described.

First method

This produces a net with the sides of the meshes parallel to the sides of the net, and with all the edges having double and treble twine at alternate meshes:
  • Start by making a mesh and hook it over a nail so that its knot is at one side
  • Make another mesh on its bottom corner (Fig 36B)
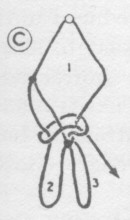
  • Make a false mesh over this and include the outside of mesh 2 in the knot (Fig 36C).
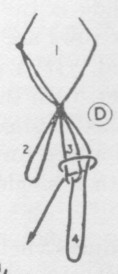
  • With the working end form mesh 4 on the bottom of the false mesh, including its own side in the knot (Fig 36D)
  • Continue to form another mesh on the bottom of mesh 2,
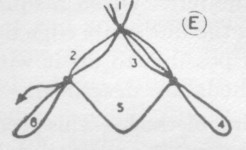
  • then a false mesh over the same knot (Fig 36E).
  • Work back across. Make a mesh on false mesh 6, including its own side in the knot, and ordinary meshes on mesh 5 and mesh 4, then a false mesh also on mesh 4 (Fig 36F).
  • Continue in this way, making false meshes and meshes which tke in their own sides alternately at each side, until the shorter edge is built up to the required length.
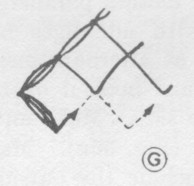
  • When the bottom-left corner is reached, take in 2 meshes with one knot, the next time the working end returns to that side (Fig 36G).
  • This reduces the row by one at that end and turns the corner at right angles, so that by subsequent reduction at that end and increasing at the other end of each row the edge is formed parallel to the right side.
  • Continue in this way until the longer edge is built up to the required length at the top-right corner.
  • Turn this corner in the same way as the bottom-left corner by taking in 2 meshes with one knot.
  • Continue making rows of meshes (Fig 36H), but reduce at both ends until only one mesh is left.
  • The knot of the 1st mesh should be untied, so that it disappears.
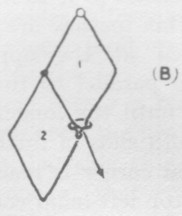
Fig 36B

Fig 36C

Fig 36D

Fig 36E
Fig 36E
Fig 36G
Second method
Fig 37 - second method


While the 1st method of square netting seems to be the one usually adopted and it has the merit of producing strong edges, thee is another which is simpler, but the edges are alternately single and double instead of double and treble:
Round nets or cast nets
Beach seine Nets
For definitions of terms, see the Glossary..

Costs or prices
Prices rise as the length increases and the mesh decreases in size.

Here are the descriptions provided in an advertisement for selling nets.

The seines may be tied on a 1/3 basis, 150ft of mesh for each 100ft of finished net. The 6ft tall net is made of mesh that is 8ft tall to allow the net to work properly. The mesh is tied approx. every 6 inches with a 1 1/5 ounce lead approx. every 12 inches and a float about every 36". The actual distance will vary depending on the mesh size:
The poles are made of PVC that is at least as tall as the net. Holes for the float and lead lines are drilled at the bottom and top and the net tied on. Additionally, glueing a PVC cap on the bottom of the pole makes it easier to slide over the bottom. It is a good idea to drill a hole in the cap to let the water run out though. It is convenient if PVC poles break down into a 1.2m (4ft) long package, with the top part of the pole retracting into the bottom section.
Castnets
The best castnets are handmade panel nets (sometimes called gore nets), made from triangular panels of machine-tied, depth-stretched mesh. . The panels are all hand cut and hand tied. What differentiates a good net from a cheap net is the manner in which the mesh is cut and tied into a net.

Cutting the 8 triangular panels extra wide, allows the net to open to the fullest possible diameter, compared to the cheaper commercially-made nets. The panels are sewn together by tying new mesh, not just "lacing" them together as is common on some nets. You can use #9 bonded twine to tie the mesh to the horn as well as "hang" the leadline. The leadline is made of 3/16" braided polyethylene rope, or 3/16" polypropylene when a stiffer leadline is preferred or needed. Leadlines should measure the full circumference dictated by the radius of the net.

Use lead that is slightly oblong, rather than the cheaper and less effective long, tapered lead. The oblong shape fits the mesh better than round but has the same positive advantages as the round lead.

Certain weights prove to work better depending on:
The standard handline is 30ft long, but can be ordered longer or shorter. I use 1/4" braided polypropylene for the handline. The poly rope is easy on the hands, floats and resists kinking and knotting.
Options
Options are items which cost more when added to the standard net.
These 'options' give useful information for those who intend to make their own nets:
Tubular nets & bags
Nets in the form of tubes have several uses:
Ways to make them:
A long tubular net is a little easier to make by spiral meshing than by the first 2 methods, but a tube started by symmetrical meshing, whether supported on a ring or not, can be converted to spiral meshing after a few rows, by the same method as described for a circular net. At the end of a normal row make half a dozen meshes, without the mesh stick, tapering them gradually up to normal size, and in the next round adjuct the sizes of the meshes attached to them, then continue meshing normally.

A tube can be converted into a bag by running a line thru the last meshes and drawing them together. This method is used on billiard table pockets. While this has the advantage of extreme simplicity it is ugly. A neater effect is obtained by reducing (Fig 21 or 22) at intervals during the last few rows, so that finally there are only a few meshes left to be drawn together.
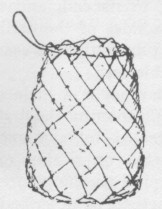
Fig 31 - A net bag
For a bag with a broader base it is better to start at the bottom, forming a flat circular net by on of the methods already described. This is hung by its center, using a rope and toggle. Tubular netting is then worked around the outside meshes to build up the sides of the bag. For a general-purpose bag, an endless line reeved thru the top meshes will act as a drawstring (Fig 31). Netting has considerable flexibility and a bag started with just the first round of a flat circular net, followed by tubular netting immediately will have useful capacity.

Landing nets and other bag-shaped nets used for catching small fish must have all meshes small, and a bag made with a circular net as a base may contain a few meshes larger than the acceptable size. Nets for thsi purpose may be started with a square base. Make an ordinary square of netting keeping all meshes of uniform size, except the corner ones which may be slightly undersize - made with the fingers instead of a mesh gauge. In forming this into a bag shape the square shape has to be converted into an approximate circle. This is done by building meshes on to the sides of the square, but reducing their size considerably at the corners for the first few rounds.

At first support the square by a rod pushed thru the meshes parallel to the edge being worked, moving it round as you turn each corner. Reduce gradually the size of 2 or 3 loops of each corner. It is a help to mark the corners of the square in some way. After 2 or 3 rounds in this way the preimeter should be nearly circular. From this stage discard the supporting rod and hang the net by its center and continue tubular netting for the required length. If the sides have to open out into a bowl shape, increase the number of meshes in occasional rows. At the top, strengthen the edge by doubling, or make one round in stouter twine.
Back to net & rope index