Net knots & hitches
Back to net & rope index
Net knots must have 2 qualities:
Netmaking uses these knots:
Clove-hitch

Clove-hitch Flat netting - Method 1:
  • load your needle
  • erect your foundation line
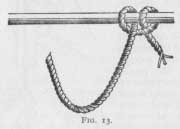
  • at the right end of the foundation line, using your needle, 'sew' a clove-hitch (Fig 13) like this:
Beginning hitch
  • from the needle, unwind about 300mm of twine which is then held in the left hand between index finger and thumb, about a hand length from the free end
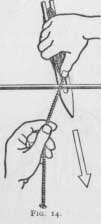
  • pass the needle away from you, over the line and down underneath it until the needle reaches a position opposite the front of the left hand (Fig 14)
  • Looping underneath
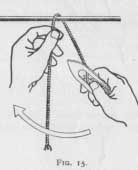
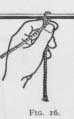
  • draw the needle towards you and upwards in the direction of the left shoulder (Fig 15) until the left hand (which keeps a non-slip grip on the twine) is brought up close to the foundation line where it will be possible to grip the 2 arts of the netting-twine between the 1st finger and thumb of the left hand, thus forming a tight loop or half-hitch over the foundation line (Fig 16).
  • Half-hitch  
    Full-hitch
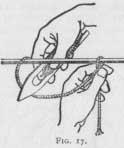
  • with the twine held firmly in the left hand, the needle is now carried away from you, over the line again, and then towards you, and underneath it, at the back of the left hand.
  • this gives a loop at the back of the left-hand thru which you now pass the needle to complete the clove-hitch (Fig 17).
  • pull the knot tight. (Fig 13)
  • Sheet-bend

    Beginning 2nd row To tie a sheet-bend:
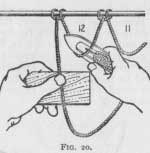
    • hold the gauge in the left hand a little way below the loop.
    • bring the needle down in front of it, up behind it, and then up thru the loop , from the far side towards you (Fig 20)
    First sheet-bend
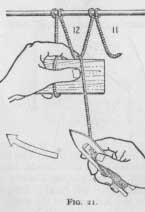
  • pull the needle strongly towards you until the upper edge of the gauge is brought hard up against the tip of the loop (Fig 21)
  • Directions for the sheet-bend
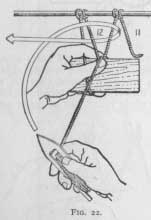
  • where the twine comes forward over the edge of the gauge grip it and the tip of loop 12 firmly between the thumb and 1st finger of the left-hand and hold them securely in that position pressed tightly against the upper edge of the gauge (Fig 22)
  • with a clockwise swing of the right-hand, indicated by the arrow ribbon in Fig 22, cause the working part of the twine, that is, the part between the gauge and the needle, to form a loop lying above and to the left of the left-hand.
  • Completing the sheet-bend
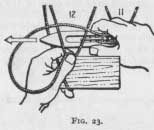
  • pass the needle behind both bars of the half-mesh 12 and out thru the loop already formed in the working part of the twine (Fig 23)
  • Completing the sheet-bend
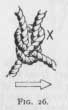
  • pull snug the knot tightly to complete the sheet bend (Fig 26)
  • Overhand knot
    Overhand knot
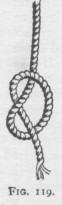
    Universally used for finishing off loose ends to prevent the strands from unlaying. (Fig 119)
    Interlaced overhand knot
    Interlaced overhand knot - method 220 Often mistakenly called "Double overhand knot".
    Useful for joining 2 twines as when beginning with a fresh needle during braiding.

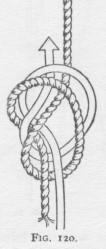
    Make an overhand knot on the old end. Interlaced overhand knot - finished 221 Then pass the free end of the fresh twine thru the knot alongside the free end of the old twine and follow around as shown by the arrow ribbon in Fig 120.
    This makes a very secure join and at the same time gives a direct lead thru it, which is a fine virtue in any joining knot (compare with Fig 126 which does not give a direct lead thru it).
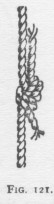
    Fig 121 shows the knot drawn tight.
    Disadvantage: difficult to untie, especially after having been wetted.
    Double overhand knot
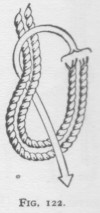
    Double overhand knot Formed by laying 2 twines side-by-side with ends together, and making a single overhand knot with both of them; simply an overhand knot made with double twine (Fig 122).
    Disadvantage: Never use as a joining knot. Under strain will pull free.
    Fisherman's knot
    Fisherman's knot 224 To join 2 lines in net-making, always use this or the interlaced overhand knot.
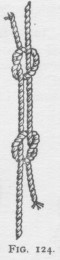
    With the free end of each piece of twine tie a compact overhand knot round the other piece. Be sure that the ends are correctly led (Fig 123) or the knot will not form properly.
    Fig 124 shows how not to tie it. Fisherman's knot 225
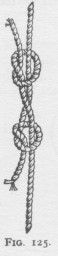
    Draw the 2 parts together adn pull tight.
    The 2 knots will twist round slightly so as to fit snugly together (Fig 125) and the finished knot will appear as in Fig 126.
    This knot is extrememly secure but can be easily untied by gripping the free ends and drawing the component knots apart. Then each can be untied without difficulty. Fisherman's knot 226
    Bowline
    Uses: Bowline 227
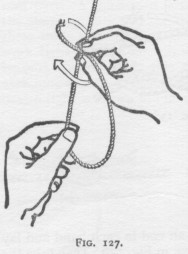
    Make a loop, fig 127, and grip the point of crossing-over between the first finger and thumb of the right hand, with the thumb underneath.
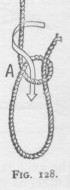
    Without changing the grip with either hand, make a clockwise twist with the right hand as indicated by the arrow ribbon. This will produce a small loop on the stnading part of the twine with the free end coming up inside it (Fig 128). Bowline 228

    Transfer the grip of the left hand to this loop where the twine crosses over (Fig 128A) and hold both parts firmly in position so that the loops keep their size and shape. Bowline 228A With the right hand complete the knot by leading the free end behind the Bowline 229 standing part and down thru the small loop as shown by the arrow ribbon.
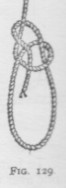
    The finished knot will appear as in Fig 129. Pull tight.

    [There is an easier one-handed blindfolded way. I will show this when I have arranged someone to photograph my hands doing it.]
    Caution: snugging the knot down carefully and tightly is essential. Carelessness is costly.
    Reef knot
    Bowline 230 Bowline 231 Bowline 232
    Reef knots are for reefing; and "good-for-nothing" else.
    Reefing is the tying of a sail to the boom or spar with loops of cord. The strain on the knot is then restricted in direction. The reef knot is quickly released by tugging one of the free ends back towards the other free end.

    Used for uniting the ends of ropes having the same size and consistency. Other combinations will slip easily. Never use for joining the twine in net-making.
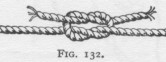
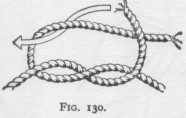
    One guide is: left-over-right, right-over-left so the free end goes out where it came in. (Fig 130, 131) Anything else is wrong as in Fig 132. This is a 'granny knot' and is both insecure and difficult to untie after being under tension. Never use it.
    Ossel knot
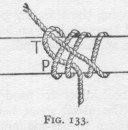
    Ossel knot 233 When mounting nets by the osselling method the ossel knot (Fig 133) is used on the larger of the 2 ropes.
    Hold the ossel near one end and let it hang down on the side of the rope next to you.
    With the upper end of the ossel make a complete turn around the rope, over the left thumb at T, and over its own part at P.
    Make a 2nd turn, missing the thumb this time, but again including its own part.
    Make a 3rd turn on the right of the standing part and the end carried back across all 3 turns and under at T.
    Remove the thumb and work tight. The completed knot is in Fig 93A.
    Advantages: This knot will not slip along the rope or become undone. For this reason it is also used for attaching snoods to fishing lines.
    Ossel hitch
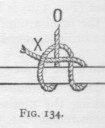
    Ossel hitch 234 The lower end of the ossel is attached to the lighter line with an ossel hitch (Fig 134).
    Bring the end down past the line on the side away from you and carry it up in front, on the left of the standing part, O.
    Pass it towards the right behind O, down in front of the line and up behind it, then to the left, over its own part and in front of O, then under at X.
    Pull tight as in Fig 93B.
    Ossel hitch 235
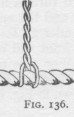
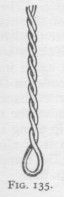
    Lark's head knot 236 In certain types of nets, such as herring, pilchard and mackerel drift nets, specially made ossels are used which have a loop at one end (Fig 135). With these ossels the ossel hitch is not used. Instead a lark's head knot (Fig 136) is formed by passing the standing part of the ossel around the line and thru its own loop. The ordinary ossel knot is made at the other end.
    Flat knot
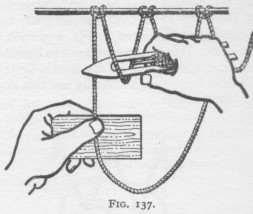
    Often, in small-meshed nets, reef knots are used for making the meshes instead of the usual sheet-bend. These reef-knots, technically known as 'flat knots', are as easily made as the more usual ones. Flat knot 237
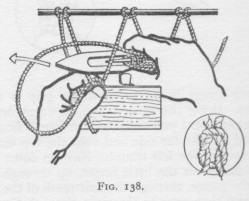
    The needle is passed thru the loop od the half-mesh of the previous round in the direction away from you, then towards the left and outbehind the left bar of the half-mesh (Fig 137). In the second movement the needle is passed behind the right bar only of the half-mesh, then towards you and out thru the opening of the loop (Fig 138). (Figs 137 & 138 should be compared with Figs 20 - 23 which show the formation of the normal sheet-bend netting knot.)
    The finished knot is shown in the inset to this figure.
    Flat knot 238 There is no change in the method of passing the needlewhen working from right-to-left.
    Braiding with the flat knotdiffers therefore in this respect from the sheet-bend method.
    Martha's vineyard netting knot
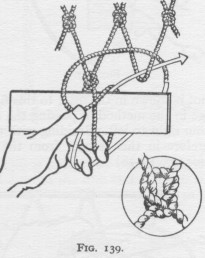
    This is the normal knot for filet work but is also used in net-making so must be described here. It closely resembles the normal sheet-bend but differs from it in the way the parts crossover one another, as will be seen on comparing the inset to Fig 139 with Figs 26, 27. Martha's vineyard netting knot 238
    It is not an easy knot to learn but when mastered high speeds can be attained. Certain West African native fishermen habitually use this knot when braiding beach seines.

    A long gauge is needed and the grip is shown in Fig 139.
    Bring the twine down, as usual, on the side of the gauge next to you and over the 4th finger of the left hand, up the far side and over the top until it can be gripped by the left thumb.
    Go down again on the far side, over the little finger, up thru the loop round the gauge, thru the half-mesh of the previous round and then over to the right thru the working loop. The whole process is clearly shown in the figure. Martha's vineyard netting knot 239

    Pull firmly downwards, releasing as you do so, first the loop on the 4th finger, then the loop on the little finger, and a knot, as illustrated, will be formed.
    It is easier to pass the needle thru the previous half-mesh in the direction opposite to that shown in the figure, that is, from the far side towards you, but if that is done a twisted mesh results.
    This is of no importance if very fine twine or thread is being used but for nets of stouter material twisted meshes should be avoided.
    This knot can be worked only in the left-to-right direction so setting up should be done on a foundation loop as described in the beginning, or on a foundation line that can be worked from both sides, or by chaining out.
    Back to net & rope index