Miscellaneous processes
Flat knotting
Sometimes for very small meshes, a different knot is used. This is actually the common reef-knot, but a netmaker calls it a flat-knot. It has the advantage of being easier to form in the very small sizes. It is worked the same right-to-left or left-to-right.
Fig 40 - Flat knotting
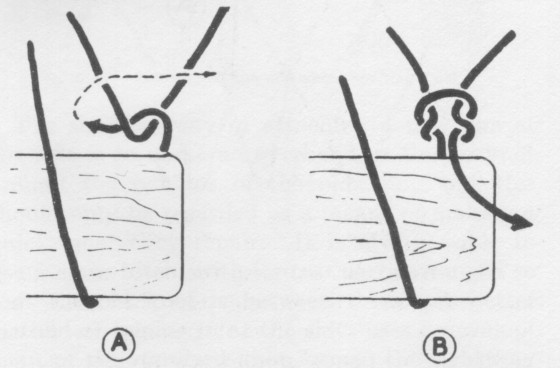
To make a flat-knot, hold the mesh-stick against the upper mesh and bring the working end around it in the usual way. Pass the needle thru the upper mesh from the front (Fig 40A) then across the front and thru again from the back, under its own loop (Fig 40B).
Fig 41 - Sliding creasing
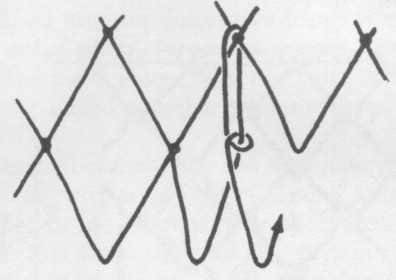
When using flat-knotting the usual methods of increasing and decreasing can be used, but because of the difficulty of passing he loaded needle thru small meshes a simplified method of creasing can be employed, called sliding creasing (Fig 41). The working end is passed over the knot in a higher rowand a half-hitch made around itself in line with the bottoms of the meshes, before continuing with ordinary meshing.
Another method of flat-knotting uses separate pairs of strands, or nettles, and has the knots horizontal instead of vertical. This is suitable for work of comparatively shallow depth - on deep work the many long strands would be tedious to handle. it is an alternative to the standard method for tubular nets fixed to rings, such as angler's landing nets and netball goals. In any case it should be started with a head rope or rod, to which the centers of the nettles are clove-hitched (Fig 42A). A useful gauge is made from a square piece of wood, the same size as the mesh, with the end cut across for half-meshes (Fig 42B). If strips are ifixed around to form a stop and the gauge mounted on a vase it may be stood on a bench. Form reef knots around the gauge, with the hands only, in the usual way (Fig 42C).
Fig 42 - Flat-knotting with separate nettles
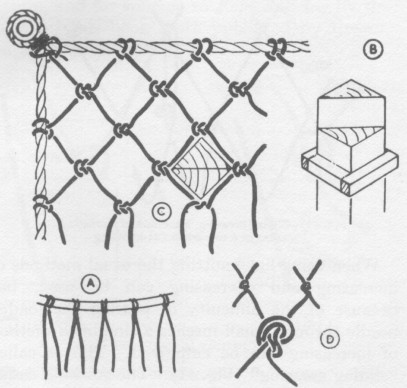
A method used for decorative fringe work, but not as satisfactory for serious work, is made around the same gauge, but he pairs of nettles are merely pulled together with overhand knots (Fig 42D).
The method of making a net with hanging lines can be used with a variety of joining knots. It is possible to use the ordinary sheetbend (Fig 43A), but this forms the knot sideways in relation to the direction the net is hanging during construction. If the net is to be used this way there is a risk of slipping. but if it can be turned so that one of the sides becomes the top in use, the knots will be secure. However, this method of construction does not appear to show any advantages over the normal methods.
Fig 43 - Netmaking using hanging lines
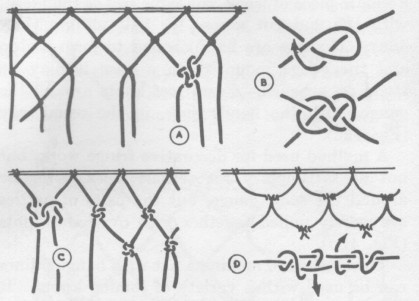
The hanging line method is more sutiable for decorative work and the carrick bend (Fig 43B) is a popular knot for this purpose. A simpler arrangement merely uses 2 interlocking overhand knots which tightten into ann attractive pattern (Fig 43C). In the finest material, such as fishing line, complicated knots can be used to make fringes. The barrel knot (Fig 43D) is one example.
Normal netting methods becomes impossible with very large ropes. Caargo knets and similar large construction may be made with metal clips, but one method of hand construction uses siezings (Fig 44A). pairs of ropes are seized together at distances equal to the length of a mesh. The seizings go around both ropes then are tightened by frapping turns between the ropes (Fig 44B). Neighbouring ropes are then seized midway between the original seizings to form meshes (Fig 44C)
Fig 44 - Cargo netting
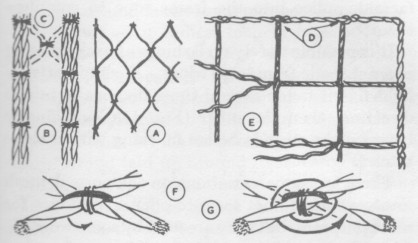
Another method of making a cargo net from natural fiber rope uses splicing. The frame of the net is amde from one length of rope with its ends spliced together. This is laid out and pegged down temporarily. The rope to form the meshes are laid across in one direction and passes thru the strands of the frome rope and spliced into it (Fig 44D). In the other direction the ropes are spliced into ne of the sides of the frame, then unlaid as far back as the first crossing. If 3-strand rope, one strand only need be unlaid. If 4-strand rope, the strands are unlaid in 2 pairs. At the first crossing tuck the single strand (or 2 of 4-strand rope) thru the other, then lay up the rope again until the next crossing, where tucking is repeated (Fig 44E). At the far side splice into the frame rope to complete the net.
It is possible to rely on lashings at each crossing of a net made from large ropes. A comparatively light line is taken several times diagonally in one direction, then the other (Fig 44F). and finally between the strnads before finishing with a clove-hitch (Fig 44G).
Fig 45 - Other mesh knots
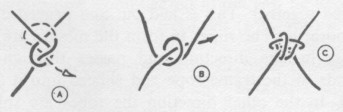
There are some variations on the normal mesh knots, which do not seem to offer advantages for most purposes, but they are used by some workers. Instead of a sheet bend it is possible to make what is really a granny knot. The upper mesh is twisted and the end worked thru it as shown (Fig 45A). When this is pulled tight the shape of the knot is more rounded and flexibel than the standard knot. It is also less bulky, but there is a slight risk of slipping.
Extra security can be given to a mesh knot by using lock knot sheet bends. The bottom of the upper mesh is drawn up to oform a small round turn (Fig 45B). The working end goes thru this and around in the usual manner (Fig 45C).
Grommet
An endless loop of rope or line is sometimes wanted. Starting a round net is an instance. This can be tied, but a better and more workmanlike result uses a grommet. A grommet is a ring with no apparent end, whichis formed from a single strand laid around itslef 3 times.
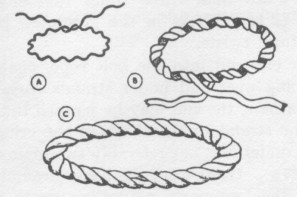
Choose a rope of the desired size and carefully unlay one strand, so as to not disturb the kinks in it. This should be just over 3 times the circumference or about 12 times the diameter of the proposed ring. Twist the 2 ends together as in an overhand knot, working the same way as the lay of the original rope (fig 46A). Continue twisting, working with one end, laying it in the hollows so that its own kinks fall into place. After one circuit with this end (Fig 46B), do the same with the other end until the 2 ends meet and you have a 3-stranded ring (Fig 46C). Taper the ends where they meet by scraping away some of the fibers, then twist them over each other and bury the ends under adjoining strands.
Fig 46 - Making a grommet
Cringle
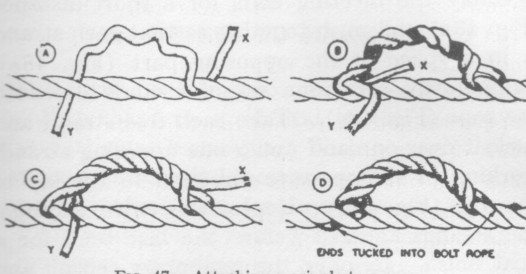
Where a net is mounted on a bolt rope, which in turn has to be supported in some way, it is better to attach loops, called cringle, to the bolt rope where the strain has to come, than subject the bolt rope itself to chafe and wear.
A cringle should be made from rope of the same size as the bolt rope:
- Use one strand, rather more than 3 times the length the cringle is to be. As in the grommet, preserve the natural twists.
- Tuck one end into the bolt rope, against the lay, going over and under strands 3 times. For neatness, the end may be scraped to a taper.
- Bow the strand to the shape of the cringle and tuck it under one, or preferably 2 main strands (Fig 47A),
- then work it back around itself, laying the 2 parts naturally together, each fitting into the hollow of the other.
- When the starting end is reached, tuck the working end under one or two main strands (Fig 47B), avoiding the one that the first end is under,
- then twist back around the cringle again, making it 3-stranded (Fig 47C).
- Finally tuck the end into the bolt rope in the same way as the staring end (Fig 47D).
Fig 47 - Attaching a cringle
Short splice
Where the ropes have to be joined, as when bolt ropes meet, the neatest joint, apart from the long splice which would be awkward under the circumstances, is a short splice:
- Unlay the meeting ends for a short distance (Fig 48B) an push together so that each strand is in a space of the opposing part (Fig 48A).
- Temporarily seize one set of strands down to the rope (Fig 48C).
- Take each free strand and tuck it over one and under one opposing strand, working in the opposite direction to the lay of the rope (Fig 48D).
- Repeat this twice, scraping the strands tapered before the last tuck for a neat finish.
- Remove the temporary seizing and tuck the other strands the opposite way in exactly the same manner.
- Where practicable, roll the splice between 2 boards to even up the tucks and give a neat appearance.
Fig 48 - a short splice