Things to make
Other ideas occurred earlier as different techniques were introduced. Here are some more ideas.
Plain rectangles of netting
Garden nets
Made with about 25mm (1") meshes in proffed string, colored dark brown or green, these nets protect fruit bushes and other crops from birds. If made with sisal in large meshes they can be supported from head ropes for training climbers, such as beans and peas.
Rabbit net
This should be made of strong twine, meazuring about 1 metre wide and any length - possibly 50 metres. A mesh of 38mm (11/2") is about right. Lace a rope thru the edges.
Cart net
These are stretched over carts carryin glivestock to prevent them jumping out. Square mesh is advised as it will maintain its shape and not pull at the edges. Thin rope and 100mm (4") mesh will make an aveerage type of net.
Cricket net
These are rectangles supported by headropes on posts. Square mesh of about 38mm (11/2") is usual.
Lawn tennis net
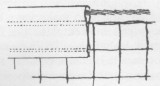
| The common size for this is 12.800 metres long by 1.070 metres high (42 feet long by 42 high). Sew a canvas band which will support the net (Fig 49). The cable must not be more than 8.5mm (11/3") diameter, and the canvas band must be between 50 and 64mm (2" and 2.5") high. |
Fig 49 - Edge of a tennis net
 |
Badminton, table tennis, deck tennis nets
As for tennis nets but check the Internet for official sizes.
Racks
These cord racks used to be found in railway carriages. Made in colored cord they can be fitted in any cabin or caravan (Fig 50A). a flat piece held on the wall by a lath at the bottom and an elastic cord at the top will take care of many odds and ends in yacht or caravan (Fig 50B).
Fig 50 - Netting racks
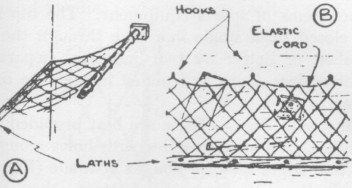
A rectangle held to the roof by elastic cord serves a similar purpose in a car or truck. Any of the racks could be made entirely of elastic cord, but care should be taken to work the meshes without tensioning the cord.
Hung vertically as cylinders with light circular floors stitched into it, and netted with a circular hole above each floor, provides collapsible and carriable substitutes for drawers.
Scarves
A piece of netting made in ordinary knitting wool will make an attractive head scarf. Variations possible indlude rows of different colors, and working with double lines in 2 colors. The knots formed in wool tend to jam tight and they cannot be unpicked, so they should be right first time.
Bags
These can be made by the methods decribed in Chapters 4 and 5, either starting with a base and working upwards or starting at the top and reducing at the bottom. The former will make a roomier bag.
A simple kit bag shape (Fig 26) will hold sail stops, ropes, sails, and many other oddments on board a boat, or it will carry footballs and many other items of sport equipment. The top may be closed by a single line rove thru the tip meshes, or better by 2 lines each separately knotted into loops and pulled in oppositie dierections to close.
Shopping bags
Fig 51 - Plywood handle for a net bag
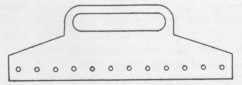
These are best provided with handles. Plywood handles with holes along the bottom edges may be bought or made (Fig 51):
- For neatness there should be an even number of meshes to divide, either equal to or greater than the total number of holes in the handles.
- Work the bag from the bottom,
- then when within a few rows of the depth required separate into 2 halves.
- Continue working one half as a piece of flat netting with straight sides, reducing to suit the number of holes in the handle if necessary.
- Let the last row of meshes pass thru the holes.
- Either cut the line and join in again to start the other side or take the working end down the edge ready to start again (Fig 52).
Fig 52 - Dividing a tubular net
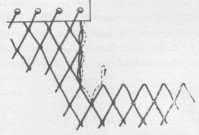
The same method may be used with other types of handle; rings, rods, or plaited rope.
A net for carrying a flask or bottle upright may be started with a grommet on which is cast a number of half-meshes, the circle being about the same size as the base of the bottle to be carried. Make a tubular netting on this and finish by making 2 opposite meshes at the top long enough to form handles. Pieces of cane about 200mm (8") long threaded on them will make comfortable grips. Alternatively form handles as described for other bags.
Hammocks
Fig 53 - Corner of a hammock
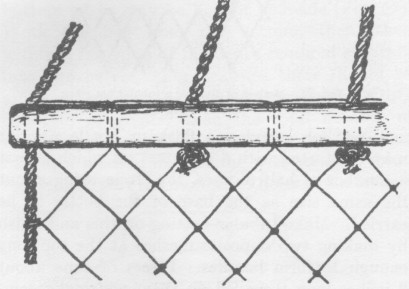
Canvas hammocks are preferred for regular use at night, but netted hammocks are more suitable for lazing in a garden. Basically a hammock is a rectangle of netting held in shape by bolt ropes and wooden spreaders. A hammock could be made from a net of the right size seized to spreaders, but a better job results from building the spreaders into the net.
Sizes will be governed by requirements, but a minimum length between spreaders is 2.2m (7'), with 2.7m (9') the preferred length for adults. The spreaders should be 750mm to 1000mm (2'6" to 3') long, although the one at the foot can be alittle shorter if preferred. The hammock is supported by a series of clew topes at each end. A mesh between 25mm and 50mm (1" and 2") is advised.
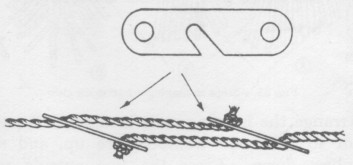
Fig 54 - Runners adust hammock sag
Here are the steps:
- Make each spreader of round or square hardwood rod - beech, birch, ash, Tasmanian oak, are best. Drill an odd number of holes into each spreader to take the clew ropes as well as the netting line. Countersink each hole slightly to minimize chafing. Clew ropes will pass thru alternate holes only, eg, 23 holes would accommodate 12 clew ropes.
- Make the 1st row of meshes thru the holes in the spreader. The outer clew ropes can be continued down the sides as bolt ropes (Fig 53).
- At the other end, work the last row of meshes thru the other spreader.
- This will give a satisfactory hammock, but it will not be adjustable. As an alternative, ignore the side bolt ropes and make the net with straight edges, preferably with a double line at the edge (Fig 16) for strength.
- When the net is completed, thread the bolt ropes thru the outer meshes and fit them with guy-line runners, as used on tents (Fig 54).
- Metal runners with notches in their edges for locking are best. This will allow the hammock to be used with varying degrees of sag..
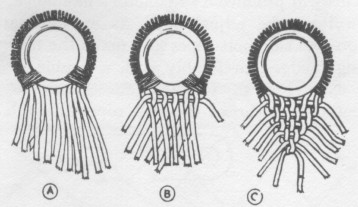
- The clew lines may be merely gathered together at a metal ring, but proper clews are neater. Get together sufficient ropes, each forming 2 clew lines. Seize them together at their centers and whip over this part fore a sufficient distance to form an eye. this may be bent into a ring as it is, or preferably bent around a brass or galvanized thimble. Hold it in place by a temporary seizing (Fig 55A).
- Arrange the hanging ends in a row. Separate them so that odd numbers are up, and even numbers are down.
- Cross the 2 outside ropes thru the space formed, and then cross all the others over each other, so that those that were up became down and the down became up (Fig 55B).
- Let the ends of the first 2 outside ropes hang free. You have finished working with them. Take the next 2 outside ropes and cross them between the others. Cross the remainder over these 2 as before. Knot these together to complete the clew (fig 55C).
Fig 55 - Hammock clew