Tubular nets
Sleeve nets, bag nets, square netting
A tube net can be made from an ordinary rectangular net by joining opposite edges. Generally it is better to braid round. This can be done in several ways depending on whether the net is to be closed at one end or not.
Sleeve netting - method 1
Method 1:
- Set up the net by the "flat netting - method 1", working from right to left.
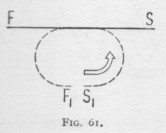
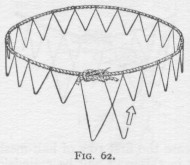
- When the required number of half-meshes has been cast on, bring the starting and finishing ends, S & F of the foundation line, together at positions S1 & F1 (as in Fig 61), and knot them firmly to form a foundation loop, cutting off the superfluous ends if necessary (Fig 62).
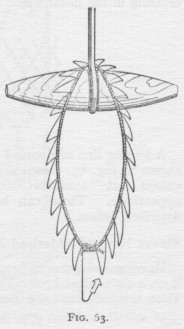
- Slip the ring of half-meshes over a toggle suspended from a hook or nail (Fig 63).
- Make the 1st mesh of the 2nd round on the 1st mesh of the previous round, and carry on to complete round 2, sliding the foundation loop around the toggle as required.
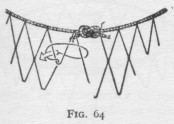 When the last mesh of this round is reached the long arm of the connecting mesh made at the beginning of the round should be included in the knot (Fig 64).
- Carry on in this way, round upon round continuously in the same direction, until the required length has been reached. Then cut the foundation loop and release the 1st row of half-meshes.
- A piece of net made in this way will be cylindrical in shape. It can be narrowed or widened at one end by bating or creasing in the usual way.
Sleeve netting - method 2
Method 2:
- Make an independent loop of spare twine and hang it on a hook. This is the foundation loop.
- Then unwind from the needle a length of twine a little longer than the length of the net it is intended to make.
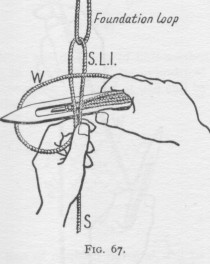
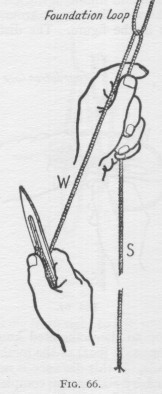 Allow this free length of twine, the standing part (Fig 66S), to hang (to the floor if necessary) and grasp it with the left hand, gripping it firmly between thumb and 1st finger.
- Pass the needle downwards thru the foundation loop, in the direction away from you, bringing it forward again on the left of the standing part.
- Draw the needle towards you until the distance between the foundation loop and the thumb of the left hand (which retains a non-slip grip of the standing part) is about equal to the length of one bar of the meshes it is desired to make.
- The working part (W) of the twine is now brought close to the standing part so that it too can be gripped between the finger and thumb of the left hand (Fig 67).
- An overhand knot is made around the standing part as shown in the figure.
- The distance from the foundation loop to the completed knot should be equal the length of one side (bar) of the meshes of which the net will be made.
- If this distance is not quite right it can be adjusted by sliding the completed knot up or down a little bit on the standing part.
- The small loop so formed is a setting-up loop (SL1) and is half the size of the full mesh.
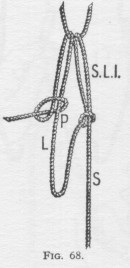
- Using the fingers of the left hand as a gauge, as shown in Fig 18, bend the twine around them, pass the needle again away from you, down thru the foundation loop, and then draw it back towards you until the knot already formed comes opposite the middle of the long side (L) of the large loop or pseudo-mesh (P) thus formed (Fig 68).
- make another overhand knot on the long side (L) in the same way as before.
When pulled tight this knot should be exactly level with the 1st one, and to the left of it.
- Continue working form right to left, until the number of setting-up loops is equal to the number of meshes required in the circumference of the net.
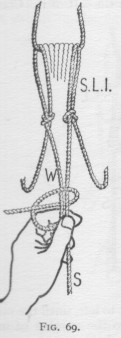
- When this number is reached, grasp the standing part of the twine, that is, the length of the twine (S) hanging from the knot of the 1st setting-up loop, between the 1st finger and thumb of the left hand and bring it side by side with the working part (W) of the twine, the part between the needle and the last knot.
- Grasp both parts between finger and thumb and make an overhand knot, the joining knot, around the standing part in the usual way (Fig 69).
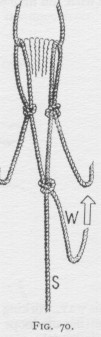
When drawn tight this knot shuld be exactly level with the tips of the pseudo-meshes (Fig 70).
- Use the gauge and continue braiding, round upon round, from left to right, making the standing part an overhand joining knot with the working part every time a round is completed. In this way a sleeve or cylinder is made that has no obvious seam.
When the net is completed the foundation loop is removed and the setting-up loops are set free. This is the best method of making such things as the netting sleeves for net-ball goalposts. The setting-up loops can be made directly on the rings or they can be laced on after being set free from a foundation loop.
Notice that the knots at the base of each setting-up loop, and the joining knots at the end of each round, are sliding knots. For most purposes there is no disadvantage in this. If however properly locked knots are required, they can be used instead; they are made in the following way:
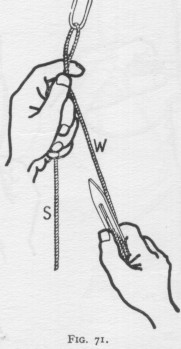
- After passing the needle thru the foundation loop as before, it is brought over towards the right so as to make the working part of the twine cross over the standing part (Fig 71).
- Arrange the point of crossing so as to make the required size of foundation loop. Then nip both parts of the twine between 1st finger and thumb of the left hand.
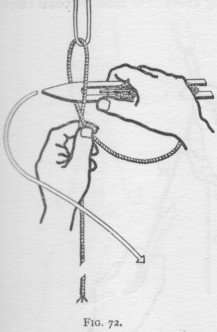
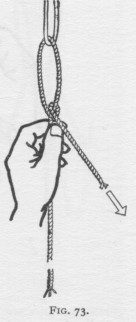
- Pass the needle from right to left thru the loop so formed (Fig 72) and then back again towards the right as indicated by the arrow ribbon. In this way a small closed loop or half-hitch is formed by the working part around the standing part hard up against the finger and thumb of the left hand (Fig73).
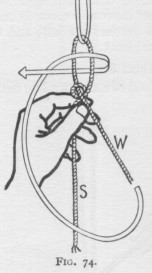
- Pull strongly on the working part, to cause the half-hitch to transfer itself from the working part to the standing part of the twine (Fig 74).
- Finish off the knot as if completing an ordinary sheet-bend. The resulting non-slippery knot will appear as in fig 75.
This knot may be used not only in making the setting-up loops but also at the end of every round when taking up the standing part in the joining knot.
Bag net - method 1
A sleeve net may be closed at one end to make a string bag or sack. This can be done by lacing aline thru the terminal meshes, drawing them tightly together and knotting securely. But this is clumsy.
Bag net - method 2
Towards the end, bate until only a few meshes are left, then take them all up in one final knot.
Bag net - method 3
The best method is to begin from the closed end:
- Unwind from a loaded needle a length of twine a little longer than the net to be made.
- Form a simple bight and slip it over a hook.
- with the working part, make an overhand knot around the standing part and adjust to form a large loop, the foundation loop. This foundation loop is not made rom separate twine, and will not be discarded.
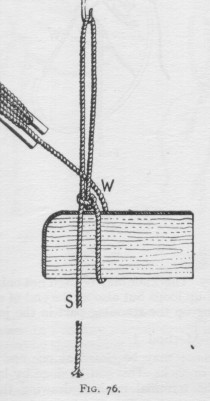
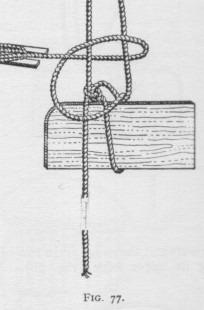
- Using this loop as if it wre the half-mesh of a previous round, make another half-mesh on it, using the gauge, passing the needle upwards thru the foundation loop from the far side towards you (Fig 76).
- The knot is completed in the normal manner (Fig 77).
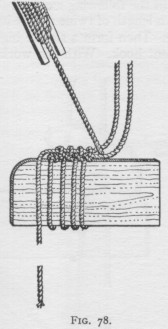
- Continue in this way forming a series of loops around the gauge and a row of foundation knots along its upper edge (Fig 78).
- When the required number of loops has been made, that is, the number of meshes needed for the net, remove the gauge and lift the foundation loop off its hook.
- Then pass the standing part thru the eye of the foundation loop.
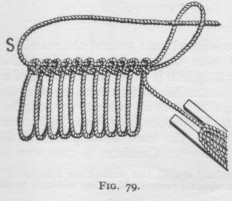
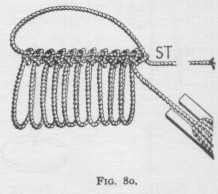
- Grasp the standing part at the point S (Fig 79) and with a strong pull draw it thru the knots until the eye of the foundation loop is tightly closed around the standing end (Fig 80).
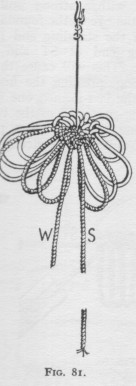
- Grasp the standing end at ST and draw it thru the closed eye. This will cause the row of knots to bend into a ring, pressing the first-formed knot firmly up against the last-formed one (Fig 81), and bringing the working part, W, of the twine side by side with the standing part, S.
- Prepare a toggle by tying one end of a piece of string string to an ordinary overall buttton (Fig 82).
- Pass the toggle-line thru the small hole formed in the center of the ring of knots and suspend the whole from a hook (Fig 81). be sure that the working part of the twine is on the left of the standing part. If the toggle-string is passed thru the knots in the wrong direction the working and standing parts will be reversed. If this happens the toggle-string must be removed and passed thru the hole from the other side. This will bring the 2 parts of the twine into the correct position.
- The 2 parts should be knotted firmly together with a reef knot formed hard up against the foundation knots where the 2 parts emerge from them.
- Round 2 is begun on the 1st ring os half-meshes, not forgetting first of all to make a joining knot on the standing part as described under method 2 for sleeve netting.
- Continue in this way, round upon round, until the desired size is reached. By this method, string bags, dip nets, and such, can be made quickly and accurately, the original ring of knots making a very pretty pattern at the bottom.
- The nets can be further shaped by appropriate creasing and bating, or by varying the size of the meshes.