Mounting a net
Terminology
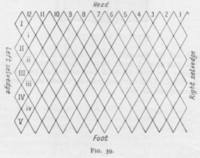 Most pieces of netting, before use, must be affixed to some kind of line or rope around some or all of their edges. This is described as 'mounting' or 'fixing' a net. There are several ways of doing this.
The meshes of ordinary netting hand diamond-wise as in Fig 39. The shape of the diamonds can be varied by the way the meshes are spread on the rope at the head of the net, that is, on the 'headline'. The closer the meshes on the headline, the narrower and deeper the meshes will be. It is necessary to give names to these various degrees of closeness and openness.
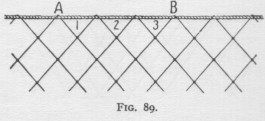 For example, a favorite mounting is to make 3 meshes occupy the space of two full stretched ones as in Fig 89; that is, if the mesh bars of thsi net were 50mm long, the distance between A and B, 3 meshes apart on the headline, would be 200mm, which is the length of 4 bars or 2 fully stretched meshes. This mounting is known as 'setting in by the third'.
If it is necessary to the net pulled out more widely 4 meshes can be made to occupy the space of 3, 5 the space of 4, and so on. This would be termed 'setting in by the 4th' and 'setting in by the 5th' respectively.
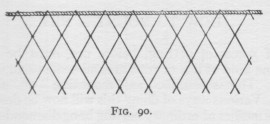
If the meshes must be more elongated vertically, and therefore narrower, 2 meshes can be made to
occupy the space of one. This is 'setting in by the half' (Fig 90).
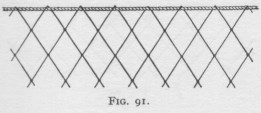 When more than 3 but less than 4 meshes (for example, 31/2 meshes) occupy the space of 2, the setting is 'without the third' (Fig 91).
If more than 2 but less than 3 meshes (for example, 21/2 meshes) were to occupy the space of 2, the setting would be 'within the third', and so on.
When the meshes at the foot of the net are also mounted on a 'footrope' the spacing must be the same as on the headline.
Methods of mounting
A single sheet of netting suspended from a rope along its upper edge is known as a piece of 'wall netting'. There are various ways of setting an ordinary wall net on its headline:
- reeving
- stapling
- osselling or norselling
- norselling & stapling
- hitchings
- stapling for fly-meshes
Let us assume that a 60metre length of netting has to be set in by the third.
Reeving
The easiest and quickest, but least satisfactory, way of mounting a net is to reeve a line thru the head meshes and fix the end ones at points 40 metres apart. The intervening meshes are then spread evenly along the line and every 6th, 12th, or 20th mesh (as the case may be) is hitched securely in position.
Stapling
A 2nd and better method is that known as 'stapling'. Let us assume that in our net the meshes are of 50mm bar, and that it is to be set in by half. A light stapling line ishitched securley to the headline near one end.
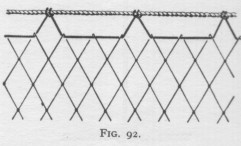 The free end of the stapling line is rove thru the 1st 3 head meshes and hitched to the headline at a point 150mm from the first knot, leaving a little slack to form a bight or staple (Fig 92).
Repeat until all the head meshes have been taken up in this way, the distance between any 2 adjacent knots being 150mm.
Longer staples, taking up more than 3 meshes may at times be used with advantage.
Norselling
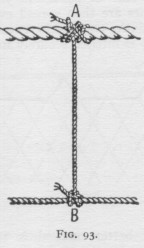
 A 3rd method is 'osselling' or 'norselling'.
Reeve a light line thru the head meshes as in method 1.
At every 6th mesh (or thereabout) attach a short piece of line 300mmm or so long which is then carried up and attached by its other end to the main headline (Fig 93). These short lengths of line are the 'ossels' or 'norsels'.
 The knot A made on the main headline is a special one known as the ossel knot.
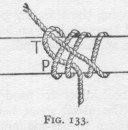
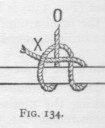
The knot B made at the other end of the ossel is an ossel hitch (Fig 133, 134).
Norselling & stapling
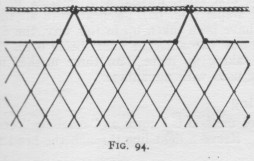 In this method the stapling is knotted to the end meshes of each staple (Fig 94). The result amounts to what is a combination of osselling and stapling. In special cases the head and foot meshes are attached direct to the mounting ropes by means of clove-hitches as the net is being made.
Hitchings
Selvages are usually attached to their mounting ropes by marline hitchings. If an ordinary selvage has been formed each mesh will be taken up in its own hitch (Fig 95).
In straight selveages, the hitchings will be evenly spaced along the ropes, hard up against the slevage knots of the net. To do this, the rope on which the net is to be mounted is stretched tightly between 2 supports. Take up a position on the right side of this rope with the net stretched along the ground on the other side.
 Begin:
- Begin at one end; either end will do according to whether you prefer to work backwards or forwards.
- With a loaded needle make a clove-hitch on the mounting rope and one or two additional hitches beside it for extra strength.
- Pick up the end of the net and include the corner mesh in the final hitches.
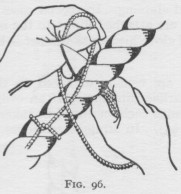
- Carry the marline line forward with the left hand and make a loop where the next hitch is to be formed (Fig 96).
- Pass the needle under the rope, thru the net (in figs 96-101, the net is not shown) and up thru the loop.
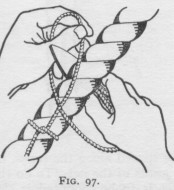
- Pull tight and a marline hitch is formed. Be sure the loop in the marline line is formed correctly or a proper marline hitch will not be formed. Compare the loop in Fig 96, which is correct with that of Fig 97, which is not correct.
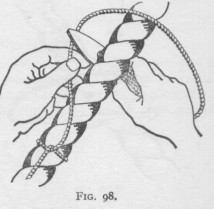
- Simple half-hitchings are sometimes used in place of marline hitchings. These are formed by passing the needle around the mounting rope and up under the marline hitch withour first making a loop (Fig 98). They are nearly so secure as marline hitchings.
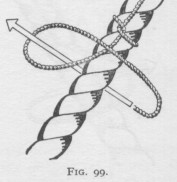
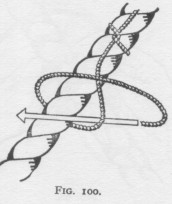
Some workers prefer to work backwards. The methods are the same, the details only being different. Fig 99 shows the formation of the marling hitch when working in this direction. It can also be formed as shown in Fig 100.
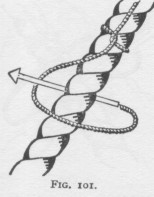
The formation of a simple half-hitching is shown in Fig 101. It is usual, at frequent intervals, to make an extra hitch alongside the ordinary hitchings to prevent the whole thing coming adrift if a break occurs anywhere in the marline line. This is particularly necessary if simple half-hitchings are used.
Stapling fly meshes
 Where the selvage consists of a series of fly-meshes (as in the wings of some trawls) a special kind of stapling is used. One end of the stapling line is knotted firmly on the rope. This line is then passed thru one corner of the nearest fly-mesh and then thru the adjacent corner of the next fly-mesh after which the next knot is tied.
Each fly-mesh is thus included in 2 staples and each staple takes in 2 fly-meshes (Fig 102 - note the doubled fly-meshes). By this method a great deal of 'give' is provided in the selvage which for certain purposes, as in the wings of trawls, may be an advantage.
Normally, the width of each staple should be roughly equal to 2 bars of the net; in other words, adjacent stapling knots should be separated by the distance between 3 knots in the net.