Mending
General principles
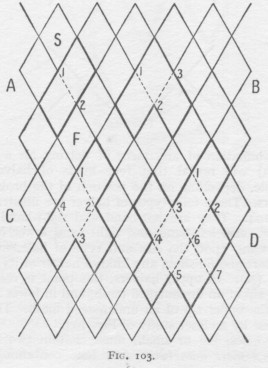 For most people, the art of mending holes in nets is more difficult to master that the art of making them. But with a little practice, aided by the judicious use of pencil on paper, the difficulties can soon be overcome.
Take the simplest hole causied by breaking a single mesh bar, asindicated by the broken line opposite A in Fig 103.
Tho simple, this break is extremely important because each of the 2 long sides of the resulting hole (outlined in heavy lines) consists of a straight line, the length of 2 mesh bars, with a knot in the middle of it. A straight side of this kind, 2 bars in legth, is called a 'halver'.
Examination of any piece of netting (or simple sketch) will reveal that 4 kinds of halvers are possible, depending on the position of the broken bar or bars.
These 4 types of halver are illustrated in Fig 104.
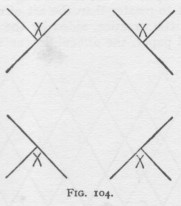 They are:
- upper halvers:
- lower halvers:
Depending upon the size and type of hole, mending can start and finsih on any kind of halver at its middle point, X.
In upper-halvers, this point is the lower tip of an undamaged mesh, and in lower-halvers it is the upper tip of an undamaged mesh. This will be clear by a closer study of Fig 103.
All holes, big or small, must contain 2 halvers and not more than two Any hole containing more than 2 halvers cannot be mended without doubling over some bars of one or more meshes. In a correctly-mened hole doubling is not permissible. before starting any mend, therefore, examine the hole and cut around its edges in such a way as to leave one convenient halver to start on and one to finish on. If the hole consists of more than a very few broken bars, the starting halver will be at the top of the hole and the finishing halver at the bottom.
In the simplest hole, formed by one broken bar, no 'cuttin gout' is necessary as 2 halves are automatically formed, and no more (Fig 103A). This hole would be mended by starting in the middle of the upper halver, that its, by picking up the bottom tip of the mesh marked S in the figure, and forming on it an ordinary netting knot.
This is done by bringing the needle up thru S from the far side towards you and then completing on it a sheet-bend in the usual way (Fig 22).
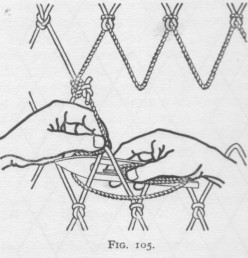
The upper tip of mesh F s then picked up by passing the needle down thru it from the far side towards you and completing the sheet-bend as shown in Fig 105. (Note: this figure depicts a bigger hole than is formed by a single broken bar.) Before this knot is formed the new mesh must be adjusted to the correct length. The figures 1 & 2 in this hole indicate the 1st and 2nd (which is also the last) knots in this mend.
A slightly bigger hole is illustrated opposite B in Fig 103 above. Here 2 mesh bars have been broken but again no cutting out is necessary as only 2 halvers have been formed.
 To mend this hole commence at 1, pick up the bottom mesh at 2 as in Fig 105, and finish at 3. Points 1 &l 3 are the mid-points of 2 halvers.
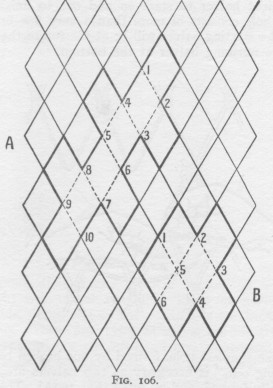
Other holes all ready for mending are shown in Figs 103C & D, and in Figs 106A & B.
The numbering shows where the successive knots are to be made, and the dotted lines indicate the new twine with which the holes are mended. (The beginner will find it helpful to use mending twine of a different color.)
In mending a more complicated hole such as in Fig 103D it will be found that, in addition to the halvers at points 1 & 7, where the mend begins and ends, you have to pick up:
- a right side-mesh at 2
- an ordinary upper mesh at 3
- a left side-mesh at 4
- a bottom-mesh at 5
- an upper mesh at 6.
We already know how to take up an upper mesh when braiding in the direction right to left. This must be done at 3 to avoid a twisted mesh. Taking up the mesh for knot 6 is done by the simple left-to-right method. But picking up the side knots involves new procedures that must now be described.
Side mesh - right side of hole
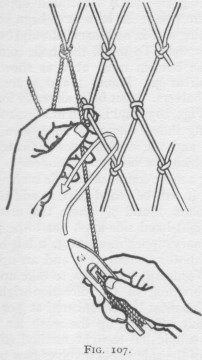
 Pick up the free knot of the side mesh between the first finger and thumb of the left hand and bring the sorking part of the mending twine down alongside it on the outside of the mesh, that is, on the left of the knot (Fig 107).
Pass the needle down thru the mesh and out again around the left lower bar as indicated by the arrow ribbon.
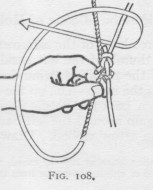
Draw tightly and a half-hitch will be formed by the mending twine around the mesh bar close up to the knot (Fig 108).
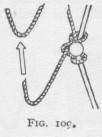
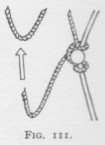 Grasp firmly between first finger and thumb in order to prevent slackening, and complete the knot as in making an ordianry sheet-bend. This will produce the knot shown in Fig 109.
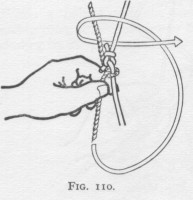
Some menders consider that a better lead to the next mesh is obtained by passing the needle in the opposite direction when completing the knot (Fig 110). The result is then as shown in Fig 111. (In Figs 109, 111 the detail of the original side knot is omitted for clarity.)
Side mesh - left side of hole
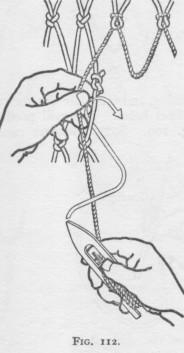
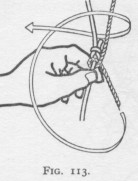
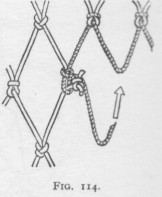
Again pick up the free knot of the side mesh between first finger and thumb of the left hand.
Lay the working part of the mending twine alongside this knot on the side next the mesh opening, that is, on the left of the knot (Fig 112).
Pass the needle under and over the lower bar of the side-mesh as indicated by the arrow ribbon.
Draw tightly, and a half-hitch will be formed by the mending twine around the mesh bar, below and close up against the knot (Fig 113).
complete in the usual way.
The side mesh as 'taken up' will appear as in Fig 114.
Quick method
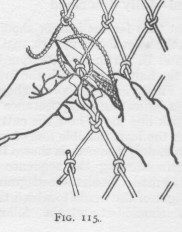
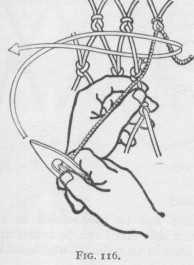
When a hole has to be mended in the shortest time, a side mesh can be taken up merely by including its knot in an ordinary overhand knot formed on the mending twine. The fingering for soing this on the right-side is shown in Fig 115 and on the left-side in Fig 116.
Large mend - fully described
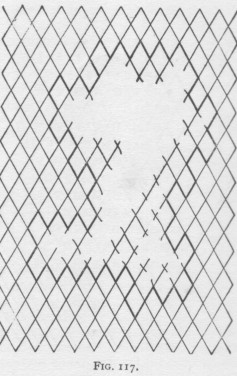 See Fig 117, with thin lines indicating its appearance before cutting out..
The thick line shows how the cutting out should be done with the least possible loss of undamaged net. The same hole, duly mended, is shown in Fig 118, the numbers again showing the sequence in which the knots would be made. In all these diagrams the numbers are on the right of the knots to which they refer.
Beginners should study the following analysis carefully until it is fully understood and the various features easily recongnizable in any hole in a piece of actual net:
- Mending commences at 1 (Fig 118) on a right upper halver at the top of the hole.
- From here braid towards the left-making knots 2- 5 as if making an ordinary piece of new net (using a gauge if necessary to get the meshes even) until knot 5 is reached.
- Knot 6 takes up a left side-mesh.
- Next braid towards the right making knots 7 - 10.
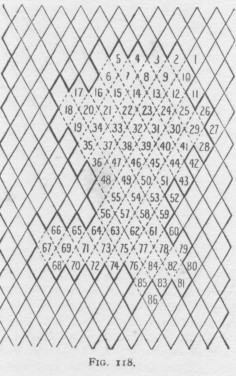
- Knot 11 takes up a rightside-mesh.
- Now ordinary braiding again, making knots 12 - 17 in the ordinary right-to-left manner. Notice that with knots 12 - 15 newly-made meshes have been taken up.
- With knots 16 & 17, meshes of the original net are taken up.
- From 17 proceed to take up a side mesh with knot 18 and then a bottom mesh at knot 19 before making the next ordinary left-to-right row of knots 20 - 26.
- From now on, a side mesh and a bottom mesh are taken up on each side (before beginning the next row across the hole) until the left side-mesh is taken up at knot 48.
- From here there is no bottom mesh waiting to be taken up so the next round is begun normally at knot 49
- Beyond this point no new features are encountered until knot 67 is completed.
- With knot 68 a bottom mesh is taken up, knot 69 is normal, back again to a bottom mesh at knot 70 - and so on until knot 77 is made.
- Now everything is straightforward until side-knot 80 is made. Knot 81 picks up a bottom mesh; 84 is normal; knot 85 picks up a left side-mesh and 86 is the finishing knot made on a right bottom halver.
It is very important, in mending, to remember:
- to pass the needle correctly thru all the upper meshes when braiding from right-to-left and left-to-right. When taking up bottom meshes, the needle should always be passed down thru them from the far side towards you. If a bottom mesh is taken up when working from left-to-right, the knot is completed by passing the needle behind the mesh bars and thru the bight of the twine, from right-to-left as shown in Fig 105.
If a bottom mesh is taken up when going from right-to-left the bight of the twine is thrown to the right and the needle passed behind the mesh bars from left-to-right. If the needle is passed in the wrong direction behind the mesh bars when completing the knots, the mending twine will lead in the wrong direction when it emerges from the finished knot, and twisted meshes will result.
- the free knots in the top and bottom meshes can be unpicked and the bits of waster twine discarded. Side knots cannot be unpicked; if this is done the mesh bars come apart and the mesh is destroyed.